User guide v2.x
Scan Station Tool assists with bulk scanning of documents; it also allows conversion to PDF, uploading to the OpenKM repository, and adding metadata.
OpenKM Server Configuration
Section titled “OpenKM Server Configuration”The Configuration / Server configuration menu option is used to show the configuration popup.
The available configuration parameters are:
| Property | Type | Description |
|---|---|---|
| Language | Select | User interface language. |
| User | String | User ID for accessing OpenKM. user1 |
| Password | String | The user’s password. pass1 |
| Host | String | OpenKM URL. https://demo.openkm.com:8080/OpenKM |
Profiles Configuration
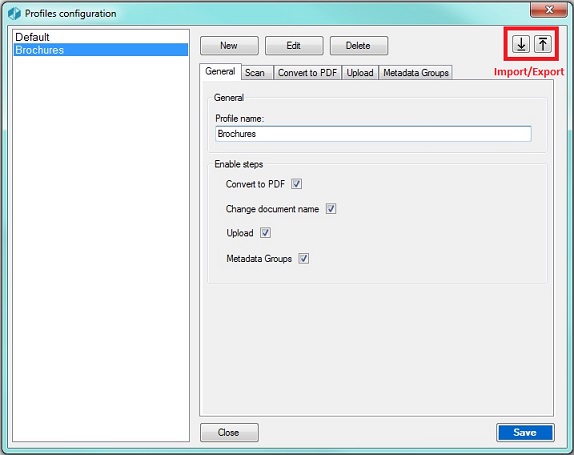
Section titled “Profiles Configuration”To create a profile, first press the “New” button and fill in the fields of the tabs according to the following description:
General Tab
Section titled “General Tab”| Property | Type | Description |
|---|---|---|
| Profile name | String | The profile name is a required field. |
| Convert to PDF | Bool | When checked, enables the step to convert to PDF. |
| Change document name | Bool | When checked, enables the step to rename documents. |
| Upload | Bool | When checked, enables the step to upload documents to the OpenKM repository. |
| Metadata groups | Bool | When checked, enables the step to add metadata. The previous step - upload - is required to enable this feature. |
Scan tab
Section titled “Scan tab”| Property | Type | Description |
|---|---|---|
| Driver | Bool | Set the driver (WIA / TWAIN) used with the scanner. |
| Scanner | Select | Select the scanner. When the scanner is not detected, change the driver (WIA / TWAIN). |
| Use predefined settings | Bool | When enabled, the scanning process will take into account the parameters specified below. |
| Use native UI | Bool | When enabled, the scanning process will ignore the parameters specified below and use the native UI of the scanner driver. |
| Paper source | Select | Set the paper input source. Options: - Glass - Feeder - Duplex |
| Color format | Select | Set the color format. Options: - Color - Grayscale - Black & White |
| Resolution | Select | Set the resolution in DPI. |
| Page size | Select | Set the size of the page. |
| Type | Select | Set the image format. |
| Scale | Select | Set a scale. |
| Horizontal align | Select | Set the horizontal alignment. |
| Brightness | int | Set the brightness. |
| Contrast | int | Set the contrast. |
Convert to PDF tab
Section titled “Convert to PDF tab”| Property | Type | Description |
|---|---|---|
| Request through a popup | Bool | When enabled, the wizard will request the following parameters during the process through a pop-up. |
| File options | Select | Option 1 - Create one file for all pages. Option 2 - Create a file every N pages. Option 3 - Create a file according to a page range. An example range: 1,2-7,8-11,12 |
| Black and white with CCITT G4 compression | Bool | When enabled, the image is compressed using the Group4 method of CCITT. |
| Percentage | Select | Set the compression percentage. |
| Force fit to A4 format | Bool | Force the image to fit an A4 size. |
Upload tab
Section titled “Upload tab”| Property | Type | Description |
|---|---|---|
| Request through a popup | Bool | When enabled, the wizard will request the following parameters during the process through a pop-up. |
| Path to upload | String | It allows you to select a path within OpenKM to which the documents will be uploaded. |
Metadata groups tab
Section titled “Metadata groups tab”Set the metadata groups that will be used by the assistant.
Import / Export profile settings
Section titled “Import / Export profile settings”In the upper-right corner of the profile configuration window, there are the “Import” and “Export” buttons; these will allow you to import or export the profiles.
Once the OpenKM server is configured and a profile has been created, the “Profiles” button is enabled.
You can select a profile. According to the selected profile, several buttons will be shown indicating the defined steps. These buttons indicate the sequence followed by the assistant until reaching the end.
Main form
Section titled “Main form”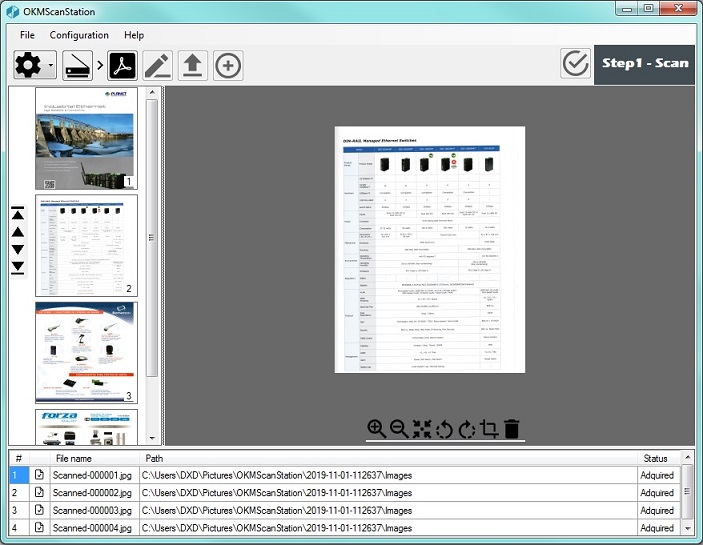
Toolbar buttons
Section titled “Toolbar buttons”The buttons on the main toolbar will be displayed according to the stages enabled in the selected profile.
| Button | Name | Action |
|---|---|---|
 |
Profiles. | Select a profile. |
 |
Scan. | Proceed to scan. The images will be saved to a folder structure based on the current date (year-month-day-hour-minute-seconds) on your PC at “C:\Users\…\Pictures\OKMScanStation\yyyy-mm-dd-hhmmss\Images”. |
 |
Convert to PDF. | Convert scanned images to PDF format. When the “Request through a popup” option is enabled in the profile, a pop-up will be displayed requesting the parameters for the conversion. The PDF files will be saved to a folder structure based on the current date (year-month-day-hour-minute-seconds) on your PC at “C:\Users\…\Pictures\OKMScanStation\yyyy-mm-dd-hhmmss\Images”. |
 |
Reset | Go back to the scan step and delete all the PDF files that have been created up to this point. |
 |
Change the document name. | Shows a form through which you can browse and rename each of the generated files. |
 |
Upload. | Upload images or PDF files to the OpenKM repositories. When the “Request through a popup” option is enabled in the profile, a pop-up window will be shown asking you to select an OpenKM destination path. |
 |
Add metadata groups. | Show the metadata forms set in the profile. |
 |
Finalize. | End of the process. |
In My Documents/OpenKM, there is a log file called OKMScanStation.log with a complete log trace.