Table of Contents
Switching the JBoss jBPM database backend is reasonably straightforward. We will step through this process using PostgreSQL and MySQL as an example. The process is identical for all other supported databases. For a number of these supported databases, a number of JDBC drivers, Hibernate configuration files and Ant build files to generate the database creation scripts are present in the jBPM distribution in the DB subproject. If you cannot find these files for the database you wish to use, you should first make sure if Hibernate supports your database. If this is the case you can have a look at files for one of the databases present in the DB project and mimic this using your own database.
For this document, we will use the jBPM jPDL installer. Download and install as described in the section called “Downloading and installing jBPM”. We will assume that this installation was done to a location on your machine named ${jbpm-jpdl-home}. You will find the DB subproject of jBPM in the ${jbpm-jpdl-home}/db.
After installing the of your choice database, you will have to run the database creation scripts to create the jBPM tables. Note that in the hsqldb inside jboss this is done automatically during installation.
Whatever database that you use, make sure that the isolation level of the configured JDBC connection is at least READ_COMMITTED, as explained in the section called “Isolation level of the JDBC connection”
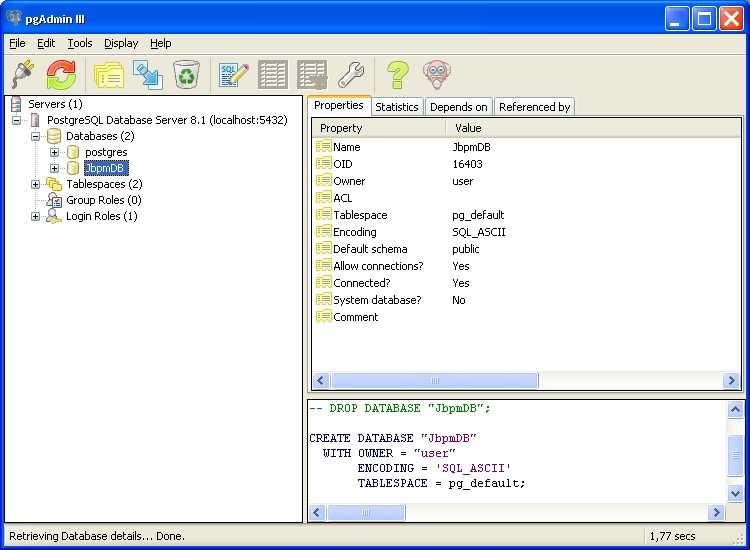
To install PostgreSQL or any other database you may be using, we refer to the installation manual of these products. For Windows PostgreSQL installation is pretty straightforward. The installer creates a dedicated Windows user and allows to define the database administrator. PostgreSQL comes with an administration tool called pgAdmin III that we will use to create the jBPM database. A screenshot of this tool right after creating the JbpmDB database with it is shown in the figure below.
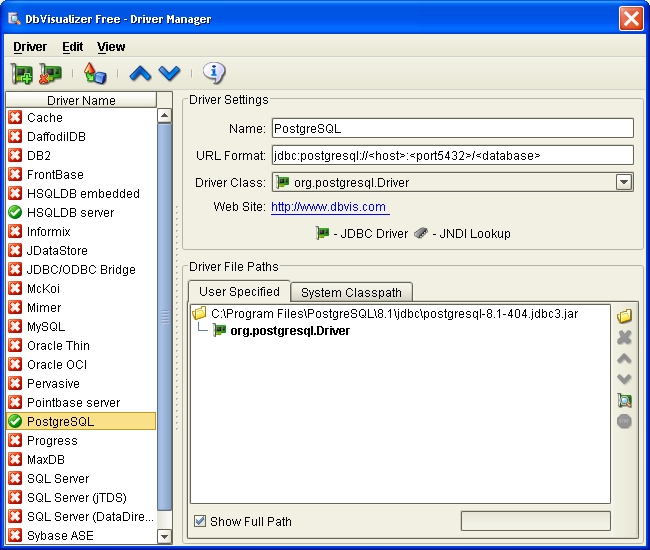
After the installation of the database, we can use a database viewer tool like DBVisualizer to look at the contents of the database. Before you can define a database connection with DBVisualizer, you might have to add the PostgreSQL JDBC driver to the driver manager. Select 'Tools->Driver Manager...' to open the driver manager window. Look at the figure below for an example of how to add the PostgreSQL JDBC driver.
Now everything is set to define a database connection in DBVisualizer to our newly created database. We will use this tool further in this document to make sure the creation scripts and process deployment are working as expected. For an example of creating the connection in DBVisualizer we refer to the following figure. As you can see, there are no tables present yet in this database. We will create them in the following section.
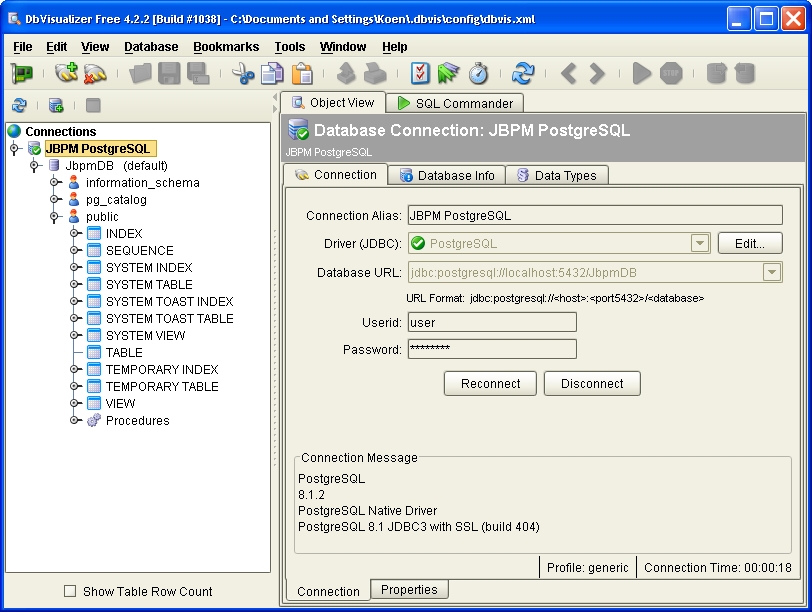
Another thing worth mentioning is the Database URL above : 'jdbc:postgresql://localhost:5432/JbpmDB'. If you created the JbpmDB database with another name, or if PostgreSQL is not running on the localhost machine or on another port, you'll have to adapt your Database URL accordingly.
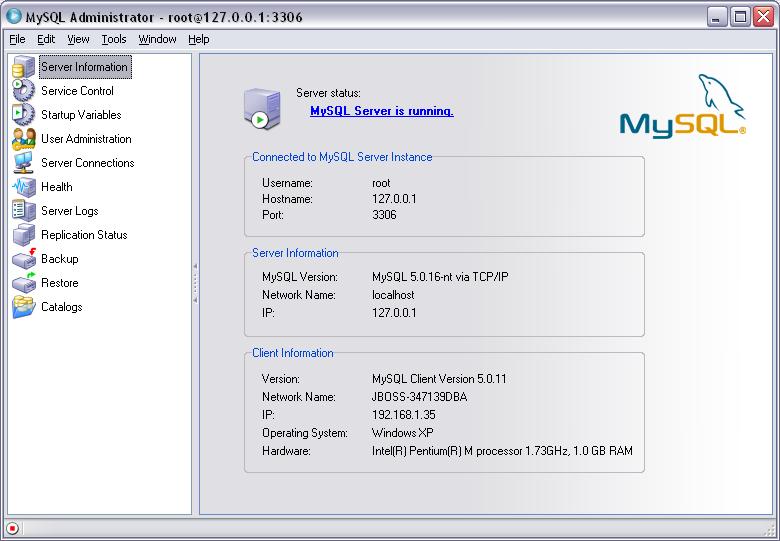
To install the MySQL database, please refer to the documentation provided by MySQL. The installation is very easy and straightforward and only takes a few minutes in windows. You will need to use the database Administration console provided by MySQL.
In order to get the proper database scripts for your
database, you should look int the directory ${jbpm-jpdl-home}/db.
Using your
database admin console, navigate to the database and then open and
execute the create script we just referenced. Below are screen shots
doing this for PostGreSQL and MySQL under their respective admin
consoles
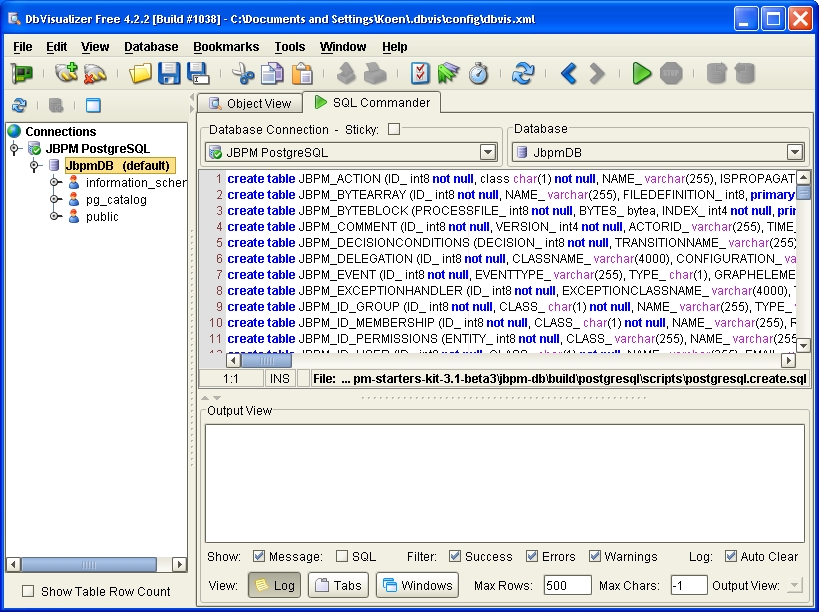
As already mentioned you will find the database scripts for a lot of the supported databases in the DB subproject. The database scripts for PostgreSQL are found in the folder '${jbpm-jpdl-home}/db. The creation script is called 'postgresql.create.sql'. Using DBVisualizer, you can load this script by switching to the 'SQL Commander' tab and then selecting 'File->Load...'. In the following dialog, navigate to the creation script file. The result of doing so is shown in the figure below.
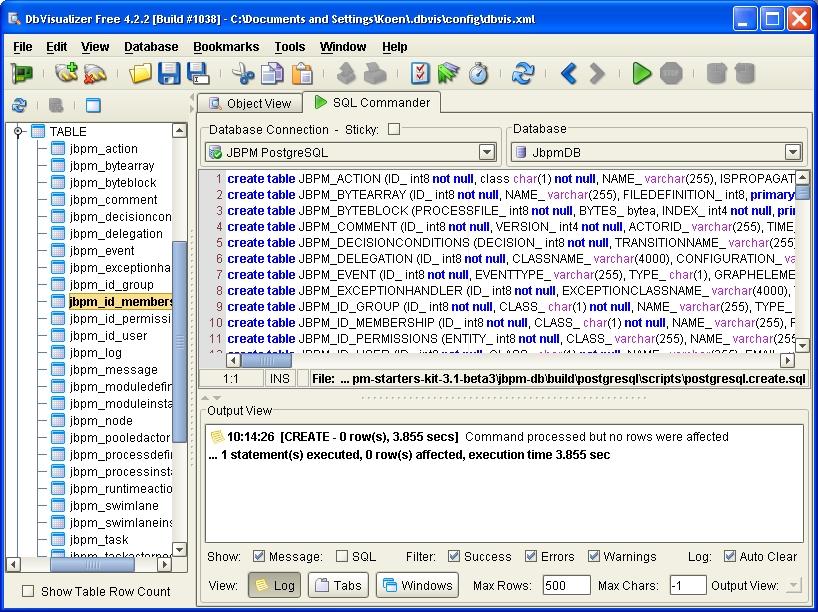
To execution this script with DBVisualizer, you select 'Database->Execute'. After this step all JBoss jBPM tables are created. The situation is illustrated in the figure below.
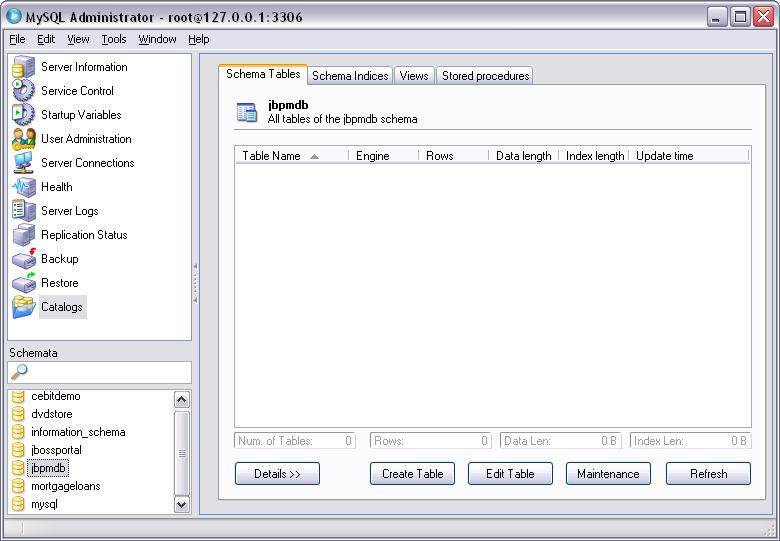
Once you have installed MySQL go ahead and create a jbpm database, use any name you like for this DB. In this example "jbpmdb" was used. A screenshot of the database is below.
You will use the MySQL command line tool to load the database scripts. Open a DOS box or terminal window and type the following command:
mysql -u root -p
You will be prompted for your MySQL password for the root account or whatever account you are using to modify this database. After logging in, type the following command to use the newly created jbpmdb:
use jbpmdb
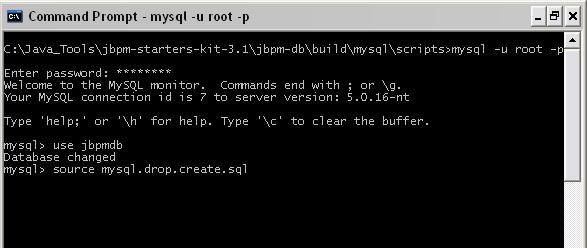
Now you can load the database script for jBPM by executing the following command:
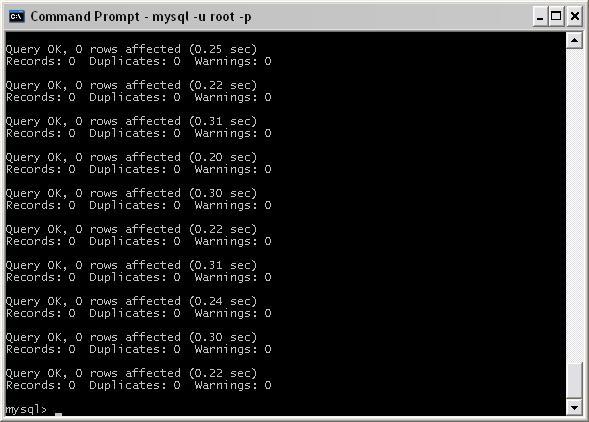
source mysql.drop.create.sql
Once the script executes, you should have the folling output in the MySQL command window:
After these steps, there is not yet any data present in the tables. For the jBPM webapp to work, you should at least create some records in the jbpm_id_user table. In order to have exactly the same entries in this table as the default distribution of the starter's kit running on HSQLDB, we suggest to run the script below.
insert into JBPM_ID_USER (ID_, CLASS_, NAME_, EMAIL_, PASSWORD_)
       values ('1', 'U', 'user', 'sample.user@sample.domain', 'user');
insert into JBPM_ID_USER (ID_,CLASS_, NAME_, EMAIL_, PASSWORD_)
       values ('2', 'U', 'manager', 'sample.manager@sample.domain', 'manager');
insert into JBPM_ID_USER (ID_,CLASS_, NAME_, EMAIL_, PASSWORD_)
       values ('3', 'U', 'shipper', 'sample.shipper@sample.domain', 'shipper');
insert into JBPM_ID_USER (ID_,CLASS_, NAME_, EMAIL_, PASSWORD_)
values ('4', 'U', 'admin', 'sample.admin@sample.domain', 'admin');Before we can really use our newly created database with the JBoss
jBPM default webapp we will have to do some updates to the JBoss jBPM
configuration. The location of the jbpm server configuration is
${jboss-home}/server/default/deploy/jbpm.
First we create a new datasource in JBoss that binds to our
database. In the default installation, this is the done in the file
jbpm-hsqldb-ds.xml. That hypersonic database
configuration file can be removed and should be replaced by
the a file that ends with -ds.xml like e.g.
jbpm-postgres-ds.xml
<?xml version="1.0" encoding="UTF-8"?>

<datasources>
  <local-tx-datasource>
    <jndi-name>JbpmDS</jndi-name>
    <connection-url>jdbc:postgresql://localhost:5432/JbpmDB</connection-url>
    <driver-class>org.postgresql.Driver</driver-class>
    <user-name>user</user-name>
    <password>password</password>
    <metadata>
      <type-mapping>PostgreSQL 8.1</type-mapping>
    </metadata>
  </local-tx-datasource>
</datasources>
For MySQL, the datasource definition would look as follows:
<?xml version="1.0" encoding="UTF-8"?>

<datasources>
  <local-tx-datasource>
    <jndi-name>JbpmDS</jndi-name>
    <connection-url>jdbc:mysql://localhost:3306/jbpmdb</connection-url>
    <driver-class>com.mysql.jdbc.Driver</driver-class>
    <user-name>root</user-name>
    <password>root</password>
    <metadata>
      <type-mapping>MySQL</type-mapping>
    </metadata>
  </local-tx-datasource>
</datasources>
Of course it is possible that you have to change some of the
values in this file to accommodate for your particular situation. You
then simply save this file in the
${jboss-home}/server/default/deploy/jbpm folder. Congratulations,
you just created a new DataSource for your JBoss jBPM server. Well,
almost... To make things really work you will have to copy the correct
JDBC driver to the ${jboss.home}/server/default/lib folder.
We already used this JDBC driver above when we were installing it in
DBVisualizer to be able to browse our newly created database. The file
is named postgresql-8.1-*.jdbc3.jar and it can be found in the jdbc
subfolder of your PostgreSQL installation folder.
For MySQL, copy the jdbc driver installed from the MySQL ConnectorJ package. The version you need to use is currently the MySQL Connector/J 3.1 available from http://www.mysql.com/products/connector/j/
The last thing we have to do to make everything run is to
update the hibernate configuration file hibernate.cfg.xml.
That file is located in directory
${jboss.home}/server/default/deploy/jbpm-service.sar.
Replace the section containing the jdbc
connection properties. This section should look like shown in the
listing below. There are two changes in this file : the
hibernate.connection.datasource property should point to the JbpmDS
datasource we created as the first step in this section and the
hibernate.dialect property should match the PostgreSQL or MySQL
dialect.
Below is a sample of the 2 changes required, comment out the version of the dialect you don't need depending on the database you are using. You can get a list of supported database Dialect types from here http://www.hibernate.org/hib_docs/v3/reference/en/html/session-configuration.html#configuration-optional-dialects
<?xml version='1.0' encoding='utf-8'?>

<!DOCTYPE hibernate-configuration PUBLIC
          "-//Hibernate/Hibernate Configuration DTD 3.0//EN"
          "http://hibernate.sourceforge.net/hibernate-configuration-3.0.dtd">

<hibernate-configuration>
  <session-factory>

    <!-- jdbc connection properties -->
    <!-- comment out the dialect not needed! -->
    <property name="hibernate.dialect">org.hibernate.dialect.PostgreSQLDialect</property>
    <property name="hibernate.dialect">org.hibernate.dialect.MySQLDialect</property>
    <property name="hibernate.connection.datasource">java:/JbpmDS</property>

    <!-- other hibernate properties
    <property name="hibernate.show_sql">true</property>
    <property name="hibernate.format_sql">true</property>
    -->

    <!-- ############################################ -->
    <!-- # mapping files with external dependencies # -->
    <!-- ############################################ -->

    ...

  </session-factory>
</hibernate-configuration>
Now we are ready to fire up the server, and look if the webapp works. You will not be able to start any processes yet, as there are no processes deployed yet. To do this we refer to the document on process definition deployment.