Configuring Apache HTTP Reverse-Proxy
Exposing OpenKM directly from Tomcat can be risky if you need the application to be accessed from the Internet (for example https://issues.jboss.org/browse/JBAS-3861). It could be infected by PerlBot. Port 8080 may be blocked by a firewall; for this reason, it is recommended to expose your OpenKM installation through the standard web port 80. In the following steps we explain how to configure Apache to handle these requests and forward them to the Tomcat application server using the AJP13 protocol.
From the Apache documentation: The AJP13 protocol is packet-oriented. A binary format was presumably chosen over the more readable plain text for performance reasons. The web server communicates with the servlet container over TCP connections. To cut down on the expensive process of socket creation, the web server will attempt to maintain persistent TCP connections to the servlet container, and to reuse a connection for multiple request/response cycles.
Internal IP vs external IP
Section titled “Internal IP vs external IP”Your OpenKM can be accessed from two different zones: Internet and LAN. This means that to access this server you need to use two IPs: external IP (Internet) and internal IP (LAN).
The internal IP address (also known as “local IP address”) is the address that is assigned by your local network router, which often begins with 192.168.x.x. These IP addresses can only be seen by other computers in your local network (LAN) and not by any computers connected in an external network such as the Internet.
To reach the Internet or a computer in another network your computer is often assigned an external IP address, which can then be used to refer to the computer in your local network.
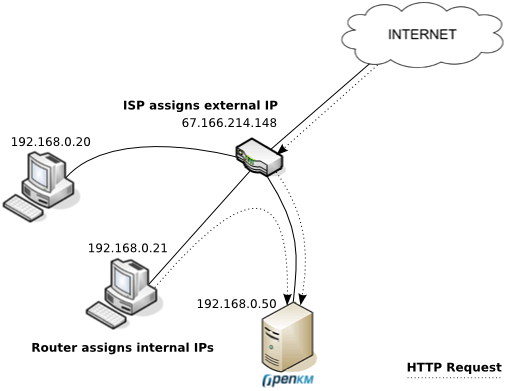
In the above picture, there are three computers in the local network that have each been assigned their own internal IP address by the router. The ISP is connected to the router and gives the router an external IP address that allows it to communicate with the Internet. On the Internet everyone sees your external IP address, but any information coming from the router is “converted” from the external IP address to the internal IP address.
So if you want your OpenKM installation accessible from both LAN and the Internet, the trick here is to configure the client computers to resolve your internal IP (192.168.0.50) if they are inside the LAN or the external IP if they are on the Internet. To resolve the Internet IP (67.166.214.148) your computer uses the public DNS. So, you need to configure a DNS server inside the LAN or modify every client’s hosts file to resolve to the internal IP.
Debian and Ubuntu
Section titled “Debian and Ubuntu”The first step is to install the required Apache software. On Debian/Ubuntu you can install Apache with a single command:
$ sudo apt-get install apache2Edit the file named /etc/apache2/apache2.conf and configure a ServerName to prevent warnings in the Apache startup process:
$ vim /etc/apache2/apache2.confServerRoot "/etc/apache2"ServerName "localhost"Enable the proxy module:
$ sudo a2enmod proxy_ajp$ sudo a2enmod proxy_wstunnelCreate the configuration file /etc/apache2/sites-available/openkm.conf with this content:
$ vim /etc/apache2/sites-available/openkm.conf<VirtualHost *:80> ServerName openkm.your-domain.com RedirectMatch ^/$ /openkm # WebSocket support - needs proxy-wstunnel ProxyPass /openkm/webSocket ws://127.0.0.1:8080/openkm/webSocket ProxyPassReverse /openkm/webSocket ws://127.0.0.1:8080/openkm/webSocket ProxyPass /openkm ajp://127.0.0.1:8009/openkm keepalive=On ProxyPassReverse /openkm http://openkm.your-domain.com/openkm ErrorLog /var/log/apache2/openkm-error.log CustomLog /var/log/apache2/openkm-access.log combined</VirtualHost>The VirtualHost ServerName must be different from the ServerName in the main Apache configuration. Enable this site configuration:
$ cd /etc/apache2/sites-available/$ sudo a2ensite openkm.confYou have to explicitly enable proxy access by editing the Apache configuration file /etc/apache2/mods-available/proxy.conf:
$ vim /etc/apache2/mods-available/proxy.conf<IfModule mod_proxy.c> #turning ProxyRequests on and allowing proxying from all may allow #spammers to use your proxy to send email.
ProxyRequests Off
<Proxy *> AddDefaultCharset off Order deny,allow Allow from all Deny from all #Allow from .example.com </Proxy>
# Enable/disable the handling of HTTP/1.1 "Via:" headers. # ("Full" adds the server version; "Block" removes all outgoing Via: headers) # Set to one of: Off | On | Full | Block
ProxyVia On</IfModule>Check the configuration
Section titled “Check the configuration”Restart Apache:
$ sudo /etc/init.d/apache2 restartCheck access to your OpenKM installation at http://openkm.your-domain.com/.
Red Hat and CentOS
Section titled “Red Hat and CentOS”Use the yum application manager to install Apache:
$ sudo yum install httpdEnable it at boot:
$ sudo chkconfig httpd --level 2345 onNow create the file /etc/httpd/conf.d/openkm.conf with this content:
$ vim /etc/httpd/conf.d/openkm.conf<VirtualHost *:80> ServerName openkm.your-domain.com RedirectMatch ^/$ /openkm # WebSocket support ProxyPass /openkm/webSocket ws://127.0.0.1:8080/openkm/webSocket ProxyPassReverse /openkm/webSocket ws://127.0.0.1:8080/openkm/webSocket ProxyPass /openkm ajp://127.0.0.1:8009/openkm keepalive=On ProxyPassReverse /openkm http://openkm.your-domain.com/openkm ErrorLog /var/log/httpd/openkm-error.log CustomLog /var/log/httpd/openkm-access.log combined</VirtualHost>Check the configuration
Section titled “Check the configuration”Restart Apache:
$ sudo /etc/init.d/httpd restartIf this command fails, try with:
$ sudo systemctl restart httpdCheck access to your OpenKM installation at http://openkm.your-domain.com/.
Error Permission denied: proxy: AJP: attempt to connect
Section titled “Error Permission denied: proxy: AJP: attempt to connect”If an error like Permission denied: proxy: AJP: attempt to connect appears in the log, solve it by executing the following command:
$ /usr/sbin/setsebool httpd_can_network_connect 1If it works, then make the configuration permanent to persist across reboots:
$ /usr/sbin/setsebool -P httpd_can_network_connect 1Windows
Section titled “Windows”The Apache web server is already included in “extras” folder.
Edit the C:\tomcat\extras\Apache\conf\httpd.conf configuration file and uncomment the VirtualHost section at the bottom. Modify the ServerName to match your server name or IP**:**
<VirtualHost *:80> ServerName 192.168.10.230
 ProxyPass /openkm ajp://localhost:8009/openkm ProxyPassReverse /openkm http://192.168.10.230/openkm
ErrorLog logs/openkm-error.log CustomLog logs/openkm-access.log combined</VirtualHost>Register Apache service
Section titled “Register Apache service”C:\> cd tomcat/extras/Apache/binC:\> httpd.exe -k installApache SSL configuration
Section titled “Apache SSL configuration”Set OpenSSL configuration location:
C:\> set OPENSSL_CONF=C:\tomcat\extras\Apache\conf\openssl.cnfExecute this command to generate the self-certificate:
C:\> cd c:/tomcat/extras/Apache/binC:\> openssl.exe req -x509 -nodes -days 365 -newkey rsa:2048 -keyout ..\conf\server.key -out ..\conf\server.crtThis is a sample output:
You are about to be asked to enter information that will be incorporatedinto your certificate request.What you are about to enter is what is called a Distinguished Name or a DN.There are quite a few fields but you can leave some blankFor some fields there will be a default value,If you enter '.', the field will be left blank.-----Country Name (2 letter code) [AU]:ESState or Province Name (full name) [Some-State]:AlicanteLocality Name (eg, city) []:AlicanteOrganization Name (eg, company) [Internet Widgits Pty Ltd]:OpenKMOrganizational Unit Name (eg, section) []:IT ManagerCommon Name (e.g. server FQDN or YOUR name) []:192.168.10.230Email Address []:noreply@openkm.comUncomment this configuration section:
# Secure (SSL/TLS) connectionsInclude conf/extra/httpd-ssl.confChange the default server name in conf/extras/httpd-ssl.conf to match your domain or IP:
# General setup for the virtual hostDocumentRoot "${SRVROOT}/htdocs"ServerName 192.168.10.230:443ServerAdmin admin@example.comErrorLog "${SRVROOT}/logs/error.log"TransferLog "${SRVROOT}/logs/access.log"Troubleshooting
Section titled “Troubleshooting”If you see an error message like:
You need to enable these Apache modules:
$ sudo a2enmod rewrite$ sudo a2enmod proxy_http$ sudo a2enmod headersIf you see errors like these:
[proxy_ajp:error] [pid 27579:tid 140057021224704] (70007)The timeout specified has expired: AH01030: ajp_ilink_receive() can't receive header[proxy_ajp:error] [pid 27579:tid 140057021224704] [client xxx.xxx.xxx.xxx:60526] AH00992: ajp_read_header: ajp_ilink_receive failed[proxy_ajp:error] [pid 27579:tid 140057021224704] (70007)The timeout specified has expired: [client xxx.xxx.xxx.xxx:60526] AH00878: read response failed from 127.0.0.1:8009 (127.0.0.1)It is possible that Tomcat is not accepting AJP connections. Please uncomment these lines in $TOMCAT_HOME/conf/server.xml
<!-- Define an AJP 1.3 Connector on port 8009 --><Connector protocol="AJP/1.3" address="127.0.0.1" port="8009" redirectPort="8443" secretRequired="false" />The secretRequired parameter is important, and if it’s not present you need to add it.
More info at Apache Tomcat 8 Configuration Reference.