Scanner client
Scanner Client allows capturing images from scanners and uploads to the OpenKM repository.
| Feature | Description | |
|---|---|---|
 |
Scan | Starts scanning process. |
 |
Convert to PDF | Convert an image or group of selected images to a PDF document. |
 |
Refresh | Refreshes tree. |
 |
Upload | Uploads a document. |
 |
Delete the PDF page. | Deletes a page from the selected PDF document. |
 |
Add page to PDF | Adds a new page to the selected PDF document. |
Requirements
Section titled “Requirements”Before running the application, make sure you have installed the following:
- Visual C++ Redistributable for Visual Studio
- .NET 4.0: Visual C++ Redistributable for Visual Studio 2012 (x86 or x64) ( Recommended ).
- .NET 2.0: Visual C++ Redistributable for Visual Studio 2008 ( x86 or x64).
- PDF Acrobat Reader.
- Microsoft .Net Framework 3.5 or upper.
Configuring
Section titled “Configuring”- Click on File > Configuration.
- Set the version to “Webservices 2.0”.
- Choose a language ( by default, English ).
- Set the username.
- Set the password.
- Set the host ( for example, http://localhost:8080/OpenKM ).
- Click on the Test button to check the connection configuration.
Compression CCITT Group4
Section titled “Compression CCITT Group4”- Click on Configuration > Compression group4 menu option.
- Check the black and white CCITT Group4 compression checkbox
- Set the percentage (Threshold), by default, is set to 80%.
- Click on Accept button.
Setting destination folder
Section titled “Setting destination folder”- Click the top right Change button.
- Select the destination folder and click on the Select button.
Setting scanner configuration
Section titled “Setting scanner configuration”- Click on Configuration / Scanner configuration.
- Change the configuration parameters.
- Click on Accept button.
Scanning
Section titled “Scanning”- Click on the Scanning button.
- Follow the wizard.
Convert scanned images to PDF
Section titled “Convert scanned images to PDF”- Choose one or several image files from the tree.
- Click on the Images to PDF button.
Uploading
Section titled “Uploading”- Choose one or several files ( images or PDF ).
- Click on the Upload button.
- Optionally you can set metadata groups.
- Choose the metadata group.
- Click on Add button.
- Fill in the metadata group fields.
- Click on Add button.
Add images to an existing PDF file.
Section titled “Add images to an existing PDF file.”- Click on Add page to PDF button. Will be shown extra icons in the toolbar.
- Action has three steps: selecting a PDF file and then clicking on the icon
 to confirm the PDF selection.
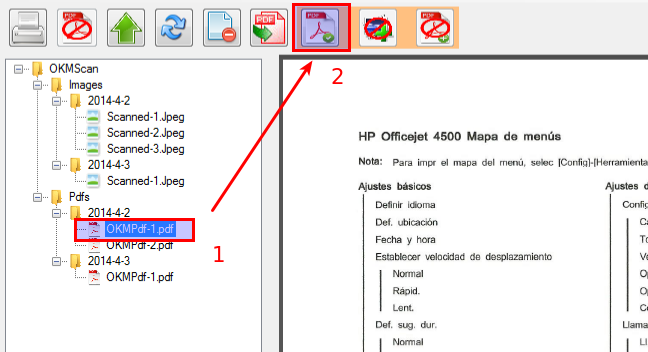
- The second step is to select one or several images and click on the icon
 to confirm the image selection.
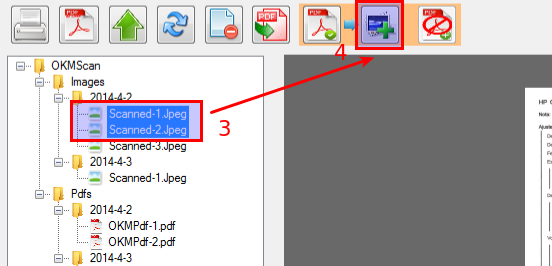
- And finally, click on the icon
 to add the images. You will be shown a popup to confirm the action; click the Yes button.
Remove pages from an existing PDF file.
Section titled “Remove pages from an existing PDF file.”- Choose a PDF file.
- Click on the Delete PDF page button.
- Select a range of pages.
- Click on Accept button.