Enable WebDAV
Once WebDAV is enabled, you can access the OpenKM repository with this URL:
http://your-domain.com:8080/openkm/webdavGo to Administration > Configuration parameters:
| Field / Property | Type | Description |
|---|---|---|
| system.webdav.server | Boolean | Enable WebDAV service. By default, it is disabled. true |
| system.webdav.fix | Boolean | The character “:” may cause problems with some WebDAV clients. Enabling this parameter will replace the character “:” in the URL with “_”. By default, it is disabled. It’s recommended to enable this parameter to prevent compatibility problems with some WebDAV clients. A path like /okm:root/myfile.txt will be translated to /okm_root/myfile.txt true |
From Linux you can use:
For example, in Ubuntu or any Debian-based Linux distro you can install this utility as follows:
$ sudo aptitude install davfs2Make a mount point:
$ sudo mkdir ~/okmdavAnd mount it:
$ sudo mount.davfs "http://your-domain.com:8080/openkm/webdav" ~/okmdavTo ease the process, add this entry to your /etc/fstab:
http://your-domain.com:8080/openkm/webdav /home/username/webdav davfs noauto,user,rw 0 0And then in the user’s home directory, look for ./davfs2/davfs2.conf. There you’ll find a if_match_bug 1 line. Uncomment it.
See also:
Windows
Section titled “Windows”Install a WebDAV client for Windows.
Here you have several options:
- https://cyberduck.io/ (Best interoperability with WebDAV servers)
- http://www.netdrive.net/ (Free for home use but does not handle document versioning properly)
- http://www.webdrive.com/ (This is the recommended option and will create a new document version when you save modifications)
- WebDAV Clients on Windows XP
Windows 10
Section titled “Windows 10”Windows 10 WebDAV support has been improved. Follow these steps to add the OpenKM repository as a network resource:
- Right-click on “This PC”
- Choose “Map network drive…”
- Click on “Connect to a Web site that you can use to store your documents and pictures” link
- A new dialog will open. Here you only have to click the “Next” button
- Click on “Choose a custom network location” and then on the “Next” button
- Write your URL like this http://your-domain.com:8080/openkm/webdav
- Enter your username and password.
- Choose a name for this connection
If you get an error when connecting to the WebDAV resource, follow these steps:
- Go to OpenKM > Administration > Config and enable the system.webdav.fix configuration parameter
- Go to the Windows server and open the Registry Editor utility (regedit.exe).
- Go to HKEY_LOCAL_MACHINE\SYSTEM\CurrentControlSet\Services\WebClient\Parameters, look for BasicAuthLevel and replace the default value “1” by “2”.
- Map your drive using this address: \\your-domain.com:8080/openkm/repository/default/okm_root/
WebDrive
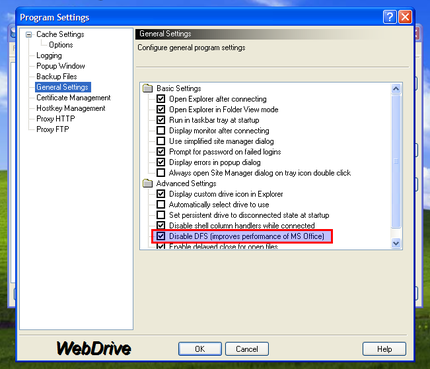
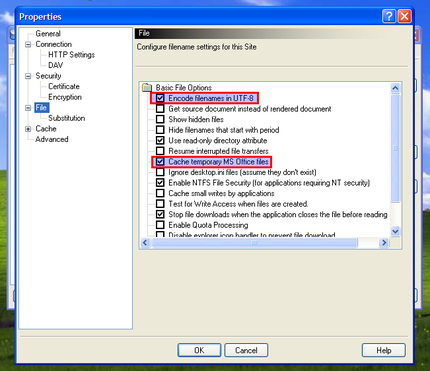
Section titled “WebDrive”Probably this is the best choice if you are using Windows, because of its stability and ease of configuration. WebDrive 10 (Version 10.00, Build 2521) has been tested with OpenKM to improve compatibility. This is the supported configuration to work with the OpenKM WebDAV connector:
Windows Web Folders
Section titled “ Windows Web Folders”Perform the following steps in Internet Explorer:
- Select File -> Open.
- Enter the URL as http://your-domain.com:8080/openkm/webdav
- Check “Open as Web Folder”.
- Click OK.
Windows XP’s “My Network Places”
Section titled “Windows XP’s “My Network Places””Windows XP supports ‘Network Places’ in the standard File dialog:
- Open networking.
- Connect as a network resource.
- Enter the URL http://your-domain.com:8080/openkm/webdav
- Enter your username and password.
- Open the Registry Editor utility (regedit.exe).
- Go to HKEY_LOCAL_MACHINE\SYSTEM\CurrentControlSet\Services\WebClient\Parameters, look for TypeUseBasicAuth and replace the default value “1” with “2”, allowing BasicAuth through non-SSL connections.
- Map your drive using this address: \\your-domain.com:8080/openkm/repository/default/okm_root/
More information at our OpenKM Forum.
Other tools
Section titled “Other tools”Install any WebDAV client for Mac. Here are some options:
- https://cyberduck.io/ (Best interoperability with WebDAV servers)
- http://www.webdrive.com/ (There is a version for Mac OS X)
Mac OS X Finder
Section titled “Mac OS X Finder”- In the Finder, select “Go” and “Connect to Server…”.
- Enter the WebDAV URL http://your-domain:8080/openkm/webdav
- Enter a username and password.
- Then the document repository is accessible!
Troubleshooting
Section titled “Troubleshooting”Slow WebDAV performance on Windows
Section titled “Slow WebDAV performance on Windows”If you have a slow WebDAV connection in Windows 7, please follow the instructions in Fix Slow WebDAV Performance in Windows 7. It turns out to be a Windows issue, not an OpenKM issue.
Furthermore, in Windows 7/Vista you need to add your certificate (if it’s not issued by a verified CA) into Windows if you plan to use WebDAV over SSL (and, like me, do not compensate with Digest auth):
- Get the certificate from the server administrator in CER format or download it from Firefox.
- Start the Windows Certificate Manager: in the command line type certmgr.msc
- In the left pane, select Trusted Root Certification Authorities.
- In the menu Actions > All Tasks select Import and then Next.
- Browse for the location of the certificate file you saved earlier on your computer and click Open.
- You will get a few more warning messages. Just proceed through them until the certificate is accepted.
Then map WebDAV content as a network drive without any additional software. The folder should be: http://your-domain:8080/openkm/webdav
To make sure that everything is OK with certificates, open the address using IE. If no warning is shown, then the certificate is fine.
Turn off file locking
Section titled “Turn off file locking”If you need write access over a network drive you need to disable File Locking (Windows does not support WebDAV file locking).
Execute the Registry Editor tool: in the command line type regedit. Modify or create this configuration parameter:
[HKEY_LOCAL_MACHINE\SYSTEM\CurrentControlSet\Services\WebClient\Parameters]"SupportLocking"=dword:00000000