Cliente de escáner
Scanner Client permite capturar imágenes desde escáneres y subirlas al repositorio de OpenKM.
| Funcionalidad | Descripción | |
|---|---|---|
 |
Scan | Inicia el proceso de escaneo. |
 |
Convert to PDF | Convierte una imagen o un grupo de imágenes seleccionadas en un documento PDF. |
 |
Refresh | Actualiza el árbol. |
 |
Upload | Sube un documento. |
 |
Delete PDF page. | Elimina una página del documento PDF seleccionado. |
 |
Add page to PDF | Añade una nueva página al documento PDF seleccionado. |
Requisitos
Sección titulada «Requisitos»Antes de ejecutar la aplicación, asegúrese de tener instalado:
- Visual C++ Redistributable for Visual Studio
- .NET 4.0: Visual C++ Redistributable for Visual Studio 2012 (x86 or x64) (recomendado).
- .NET 2.0: Visual C++ Redistributable for Visual Studio 2008 ( x86 or x64).
- PDF Acrobat Reader.
- Microsoft .Net Framework 3.5 o superior.
Configuración
Sección titulada «Configuración»- Haga clic en File > Configuration.
- Establezca la versión en “Webservices 2.0”.
- Elija el idioma (por defecto, inglés).
- Establezca el nombre de usuario (username).
- Establezca la contraseña (password).
- Establezca el host (por ejemplo http://localhost:8080/OpenKM).
- Haga clic en el botón Test para comprobar la configuración de la conexión.
Compresión CCITT Group4
Sección titulada «Compresión CCITT Group4»- Haga clic en la opción de menú Configuration > Compression group4.
- Marque la casilla black and white CCITT Group4 compression
- Establezca el porcentaje (umbral), que por defecto es el 80%.
- Haga clic en el botón Accept.
Establecer la carpeta de destino
Sección titulada «Establecer la carpeta de destino»- Haga clic en el botón Change de la parte superior derecha.
- Seleccione la carpeta de destino y haga clic en el botón Select.
Establecer la configuración del escáner
Sección titulada «Establecer la configuración del escáner»- Haga clic en Configuration / Scanner configuration.
- Cambie los parámetros de configuración.
- Haga clic en el botón Accept.
Escaneo
Sección titulada «Escaneo»- Haga clic en el botón Scanning.
- Siga el asistente.
Convertir las imágenes escaneadas a PDF
Sección titulada «Convertir las imágenes escaneadas a PDF»- Elija uno o varios archivos de imagen del árbol.
- Haga clic en el botón Images to PDF.
- Elija uno o varios archivos (imágenes o PDF).
- Haga clic en el botón Upload.
- Opcionalmente, puede establecer grupos de metadatos.
- Elija el grupo de metadatos.
- Haga clic en el botón Add.
- Rellene los campos del grupo de metadatos.
- Haga clic en el botón Add.
Añadir imágenes a un archivo PDF existente
Sección titulada «Añadir imágenes a un archivo PDF existente»- Haga clic en el botón Add page to PDF. Se mostrarán iconos adicionales en la barra de herramientas.
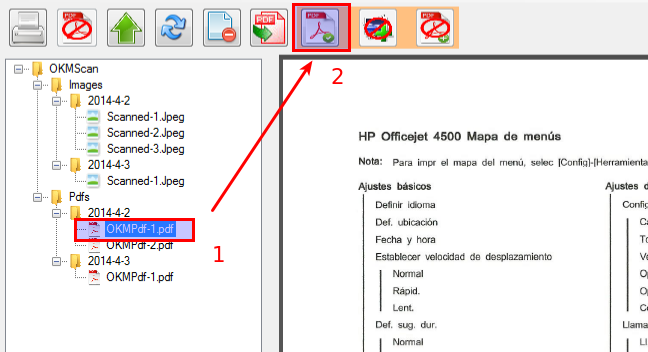
- La acción tiene tres pasos; el primero es seleccionar un archivo PDF y hacer clic en el icono
 para confirmar la selección del PDF.
- El segundo paso es seleccionar una o varias imágenes y hacer clic en el icono
 para confirmar la selección de imágenes.
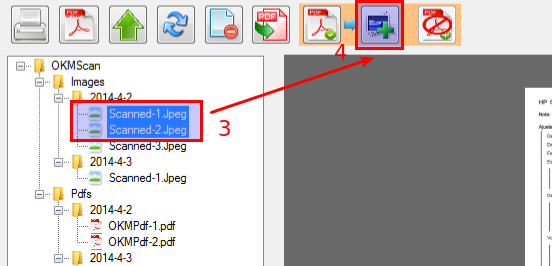
- Y, por último, haga clic en el icono
 para añadir las imágenes. Se mostrará una ventana emergente para confirmar la acción; haga clic en el botón Yes.
Eliminar páginas de un archivo PDF existente
Sección titulada «Eliminar páginas de un archivo PDF existente»- Elija un archivo PDF.
- Haga clic en el botón Delete PDF page.
- Seleccione un rango de páginas.
- Haga clic en el botón Accept.