Custom UI template
Developer information for Sample Spring Boot base project with OpenKM authentication and support for JSP, JSTL & REST.
To learn more about Spring Boot, please visit https://projects.spring.io/spring-boot/
There is also a very good tutorial about Spring Boot at https://spring.io/guides/gs/spring-boot/
General description
Section titled “General description”Properties file
Section titled “Properties file”You have to create a file called custom.properties inside $CATALINA_HOME folder.
All application properties will be read from this file. If you need to change this path you must modify the class MainAppConfig
For more information: https://docs.spring.io/spring-boot/docs/current/reference/html/boot-features-external-config.html (section 24.3)
These properties are:
| Property | Description |
|---|---|
| openkm.url | OpenKM url |
| anonymous.user | Anonymous user name Used to get web services to OpenKM if no user is provided. |
| anonymous.password | Anonymous user password |
| admin.user | Admin user name Used to get web services to OpenKM if no user is provided. |
| admin.password | Admin user password |
| preview.download.url | Document preview url |
| logback.file | Logback file name |
Authentication
Section titled “Authentication”This project is configured to authenticate against an OpenKM instance. It works using OpenKM SDK through web services.
OpenKM instance URL is defined in the openkm.url configuration property.
Log file
Section titled “Log file”You must copy file logback-custom.xml to $CATALINA_HOME folder. This file is used by log system.
To change log level for a particular package:
<?xml version="1.0" encoding="UTF-8"?><included> <logger name="com.openkm" level="INFO"/></included>Remember me
Section titled “Remember me”This sample customization uses H2 database to store remember me data. A database file called custom.mv.db will be created into the user home directory.
There is a file called import.sql which contains SQL sentences that are executed when application starts. In this particular case it only contains one sentence to create the database table to allow the “remember me” feature.
Roles management
Section titled “Roles management”In file menu.jsp you can see how the roles are managed by the application:
<sec:authorize access="hasRole('CATALOG')">Using this code an user is able to see or not to see this menu option, depending on his roles. However, if you does not want to allow a user to access a resource you can con figure it in WebSecurityConfig file.
Bootstrap
Section titled “Bootstrap”The application uses Bootstrap in order to make a beautiful and responsive design. More information about Bootstrap at http://getbootstrap.com/
Packaging
Section titled “Packaging”This application could be packaged as well as a jar and war. In this pom configuration the artifact will be a war.
If you need to change packaging please see this url: http://docs.spring.io/spring-boot/docs/current/reference/htmlsingle/#build-tool-plugins-maven-packaging (section 66.2)
Application port
Section titled “Application port”If you packaged the application as a jar you could change the port.
To do that please visit: http://docs.spring.io/spring-boot/docs/current/reference/htmlsingle/#cli-default-import-statements (section 72.4)
Catalog information
Section titled “Catalog information”Description
Section titled “Description”This sample contains a catalog system for OpenKM:
- Using OpenKM a user could upload files to a folder cp.pending.folder (we will se what is this folder)
- An automation we will add okg:type metadata to this document
- Using the catalog system of this application we will add some metadata to this document
- An automation we will move this document to other folder
The main classes of the catalog system are:
- CatalogController: app routing of the catalog system
- CatalogServiceImpl: services for the catalog system
- WSCacheDAOImpl: manages the webservices to communicate OpenKM and this app
Installation
Section titled “Installation”You must read the following steps in order to configure the application correctly:
Step 1: Download
Section titled “Step 1: Download”Download the application from OpenKM Download center.
Step 2: Role creation
Section titled “Step 2: Role creation”Create ROLE_CATALOG and add to the user used in the application.
See Manage roles section for more information.
Step 3: SQL data needed
Section titled “Step 3: SQL data needed”In order to execute SQL sentences go to Administration > Utilities > Database query and enter these queries:
CREATE TABLE CP_DOCUMENT_TYPE(ID INT NOT NULL, TYPE VARCHAR(100) NOT NULL, METADATA_GROUP VARCHAR(100) NOT NULL);CREATE TABLE CP_AGENCY(ID INT NOT NULL, NAME VARCHAR(100) NOT NULL);INSERT INTO CP_DOCUMENT_TYPE (ID, TYPE, METADATA_GROUP) VALUES (1, 'Consulting', 'okg:consulting');INSERT INTO CP_DOCUMENT_TYPE (ID, TYPE, METADATA_GROUP) VALUES (2, 'Marketing', 'okg:marketing');INSERT INTO CP_AGENCY (ID, NAME) VALUES (1, 'Web');INSERT INTO CP_AGENCY (ID, NAME) VALUES (2, 'Desktop');The parameter cp.pending.folder contains the folder to read documents to catalog. You need also to create this folder in the Taxonomy manually:
INSERT INTO OKM_CONFIG (CFG_KEY, CFG_TYPE, CFG_VALUE) VALUES ('cp.pending.folder', 'string', '/okm:root/pending');INSERT INTO OKM_CONFIG (CFG_KEY, CFG_TYPE, CFG_VALUE) VALUES ('cp.document.type', 'list', '');Update the values of the property cp.document type:
1;okg:consulting;Consulting2;okg:marketing;MarketingStep 4: Metadata
Section titled “Step 4: Metadata”<?xml version="1.0" encoding="UTF-8"?><!DOCTYPE property-groups PUBLIC "-//OpenKM//DTD Property Groups 2.9//EN" "http://www.openkm.com/dtd/property-groups-2.9.dtd"><property-groups> <property-group label="Document type" name="okg:type"> <select label="Type" name="okp:type.type" type="simple" optionsQuery="select ID, TYPE from CP_DOCUMENT_TYPE order by TYPE asc" /> </property-group> <property-group label="Consulting" name="okg:consulting"> <input label="Date" type="date" name="okp:consulting.date" /> </property-group> <property-group label="Marketing" name="okg:marketing"> <select label="Agency" name="okp:marketing.agency" type="simple" optionsQuery="select ID, NAME from CP_AGENCY order by NAME asc" /> <input label="Date" type="date" name="okp:marketing.date" /> </property-group></property-groups>Step 5: Automations
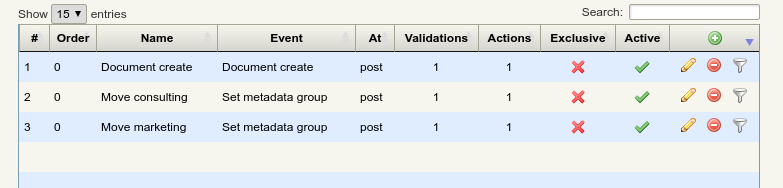
Section titled “Step 5: Automations”You have to create three automations like the following (see Automation section for more info):
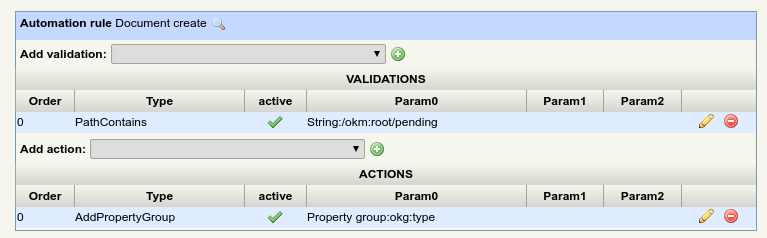
1. Add empty type to a document in pending folder
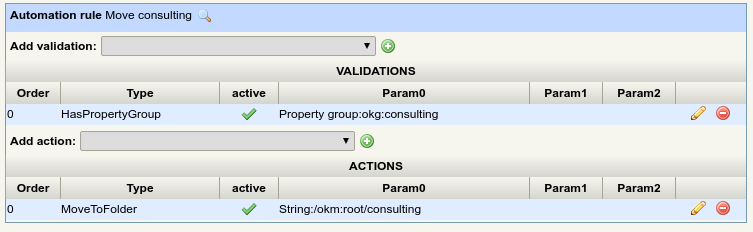
2. Move consulting documents to “consulting” folder
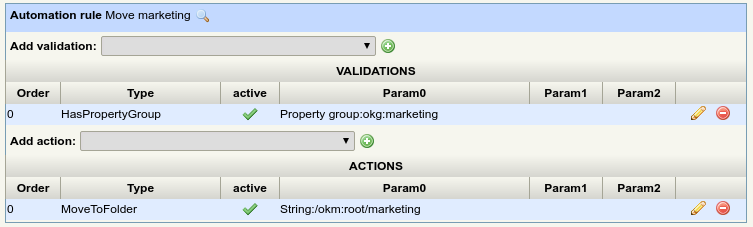
3. Move marketing documents to “marketing” folder